Create a Windows 11 Widget in C#
A complete guide to creating your first Windows widget from an empty project to a pinned, working widget.
Live API integration, state persistence, and MSIX packaging — everything the official docs skip.
 Pavel Osadchuk
- A widget with three sizes (small, medium, large) and a background image
- Live API integration with graceful failure handling
- State persistence via
CustomState— survives app restarts - A loading state so the widget is never blank
- A deployable MSIX package
Windows 11 has a Widget Board — a dedicated surface one Win+W away. You can put your apps or widgets on it. It's not a browser extension, and no WebView involved anymore. A native app that the OS renders for you.
This tutorial builds a cat fact widget from an empty project to a pinned, working widget on the board. It fetches random cat facts from a live API, shows them with a background image, and lets users tap a button for a new fact.
Why cat facts? Because the official Microsoft tutorial uses hardcoded data and a click counter. That teaches the plumbing but skips the part you'll struggle with in practice: calling a real API from synchronous callbacks, handling failure states, persisting data across restarts, and wiring the package manifest without silent breakage.
We do all of that here. The complete source code is available on GitHub.
- Windows 11
- Visual Studio 2026 with the .NET desktop development workload (.NET 10 projects need Visual Studio 2026)
- Windows SDK 10.0.22000.0 or newer
- MSIX Packaging Tools component installed
- Developer Mode enabled (Settings → For developers)
- Basic C# knowledge — no prior widget or WinUI experience needed
Three players:
Widget Host is the Windows Widget Board itself. It owns the rendering surface. You never draw pixels directly — you send a JSON template, and the host renders it.
Widget Provider is your app. It implements IWidgetProvider and responds to lifecycle events: "a widget was pinned," "the user clicked a button," "the widget became visible."
Adaptive Cards are the templating format. You describe your widget's layout as JSON with a fixed set of components — text blocks, images, containers, buttons. Think HTML but constrained. The host merges your template with a data payload at render time.
The activation flow:
- User pins your widget from the Widget Board
- Host reads your provider and widget definition from the package manifest
- Host activates your COM provider class by CLSID
- Host calls provider lifecycle methods —
CreateWidget,OnActionInvoked, etc. - Your provider sends template + data + state back to the host
- Host renders the card and persists your
CustomStatestring
Your app is a background process. It has no window of its own — the Widget Board is the window.
sequenceDiagram
    actor User
    participant Board as Widget Board
    participant Windows as Windows (COM)
    participant Provider as Your App
(IWidgetProvider)

    User->>Board: Pins widget (Win+W)
    Board->>Windows: Activate CLSID
    Windows->>Provider: Launch exe + COM factory
    Provider-->>Windows: IWidgetProvider instance

    Note over Board,Provider: Widget lifecycle begins

    Board->>Provider: CreateWidget()
    Provider->>Board: Loading template + "{}"
    Provider->>Provider: async API call
    Provider->>Board: Main template + data + CustomState

    Note over Board: Host renders Adaptive Card

    User->>Board: Clicks Refresh
    Board->>Provider: OnActionInvoked("refresh")
    Provider->>Provider: async API call
    Provider->>Board: Updated data + new CustomState
.exe directly. It asks Windows for a COM object with a specific CLSID, and Windows finds your registered app. This means boilerplate code for a COM class factory. Annoying, but unavoidable. You'll write it once and forget about it.
Create a Console App in Visual Studio. Name it something like Playground (or whatever fits your naming convention).
Replace the default .csproj content with:
<Project Sdk="Microsoft.NET.Sdk">
  <PropertyGroup>
    <OutputType>Exe</OutputType>
    <TargetFramework>net10.0-windows10.0.22000.0</TargetFramework>
    <TargetPlatformMinVersion>10.0.22000.0</TargetPlatformMinVersion>
    <Platforms>x64;ARM64</Platforms>
    <RuntimeIdentifiers>win-x64;win-arm64</RuntimeIdentifiers>
    <ImplicitUsings>enable</ImplicitUsings>
    <Nullable>enable</Nullable>
  </PropertyGroup>

  <ItemGroup>
    <PackageReference Include="Microsoft.WindowsAppSDK" Version="2.5.1" />
  </ItemGroup>
</Project>
Why these settings:
- Windows-specific TFM (
net10.0-windows10.0.22000.0) — widget APIs are Windows-only. A plainnet10.0TFM won't compile. - Concrete runtime identifiers — MSIX packaging requires a specific architecture target;
AnyCPUwon't work. We list only x64 and ARM64 because x86 is not supported by the Widget Board. - Windows App SDK — provides the
IWidgetProviderinterface andWidgetManagerAPI.
Microsoft.WindowsAppRuntime.2. Upgrading a 1.x widget project means bumping the PackageReference and rebuilding.We'll add MSIX packaging properties later in the manifest step. For now, verify the project builds:
dotnet buildAdaptive Cards are a Microsoft-developed, open card-exchange format. You describe your UI in JSON — layout, text, images, buttons — and the host app renders it natively. No HTML, no CSS, no WebView. The same card schema works in Teams, Outlook, and Windows Widgets, though each host supports different feature subsets.
Cards declare a schema version (we use 1.6). Be aware that not all Adaptive Cards features work in the Widget Board — even some from 1.5 and 1.6 are unsupported, such as badges, code blocks, and certain input types. Stick to core layout elements and test in the actual widget host, not just the online designer.
We need two templates: one for the loaded state (showing a cat fact) and one for the loading state (shown while the API call runs).
Main template — Templates/CatFactTemplate.json
{
  "type": "AdaptiveCard",
  "$schema": "http://adaptivecards.io/schemas/adaptive-card.json",
  "version": "1.6",
  "backgroundImage": "${backgroundImageDataUri}",
  "header": {
    "text": "Random Cat Fact"
  },
  "body": [
    {
      "type": "Container",
      "items": [
        {
          "type": "TextBlock",
          "text": "${fact}",
          "horizontalAlignment": "Center",
          "weight": "Bolder",
          "wrap": true,
          "$when": "${$host.widgetSize == \"small\"}"
        },
        {
          "type": "TextBlock",
          "text": "${fact}",
          "horizontalAlignment": "Center",
          "weight": "Bolder",
          "wrap": true,
          "size": "Large",
          "$when": "${$host.widgetSize != \"small\"}"
        },
        {
          "type": "TextBlock",
          "text": "${errorMessage}",
          "wrap": true,
          "color": "Warning",
          "isSubtle": true,
          "size": "Small",
          "$when": "${errorMessage != null}"
        }
      ],
      "height": "stretch",
      "horizontalAlignment": "Center",
      "verticalContentAlignment": "Center"
    }
  ],
  "actions": [
    {
      "type": "Action.Execute",
      "title": "Refresh",
      "verb": "refresh",
      "$when": "${$host.widgetSize != \"small\"}"
    }
  ]
}
Key concepts:
Data binding. ${fact} is a placeholder. You send the actual text as a separate JSON data payload. The host merges template + data at render time.
Conditional rendering. $when expressions adapt a single template to different widget sizes. The host sets $host.widgetSize automatically. Here, small widgets get default-sized text; medium and large get larger text. The refresh button is hidden on small — there's not enough room.
Background image. backgroundImageDataUri receives a base64 data URI from the provider. We use a data URI instead of ms-appx:/// because data URIs render more reliably in the widget host.
Error display. ${errorMessage} only appears when non-null — so the widget shows a warning when the API fails, without replacing the last known fact.
Actions. Action.Execute with "verb": "refresh" creates a button. When clicked, the host sends that verb string back to your provider. You decide what it means in code.
Loading template — Templates/LoadingTemplate.json
{
  "type": "AdaptiveCard",
  "$schema": "http://adaptivecards.io/schemas/adaptive-card.json",
  "version": "1.6",
  "body": [
    {
      "type": "TextBlock",
      "text": "Loading latest fact...",
      "isSubtle": true,
      "wrap": true,
      "height": "stretch"
    }
  ]
}
This is what users see during the API call. In practice it flashes for a moment — the API responds quickly — but a widget should never be blank.
The Widget Board lets users pick from three card sizes when they pin a widget:
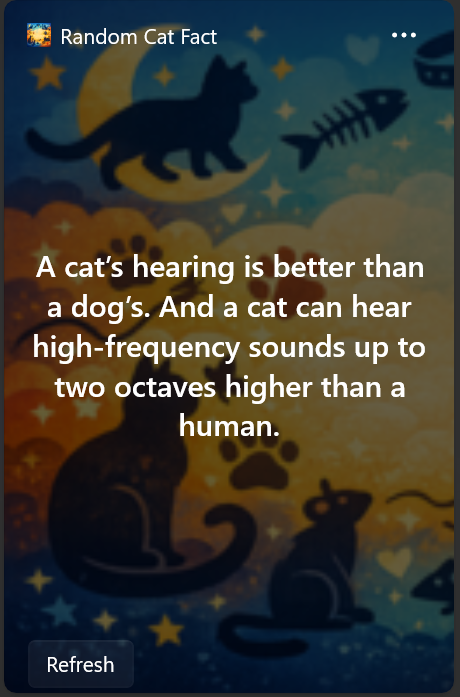
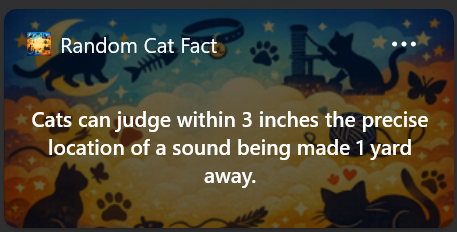
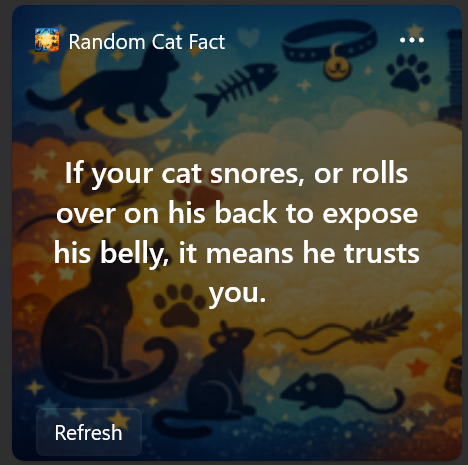
- Small — a wide, low-profile tile. Room for a single text block; no space for action buttons.
- Medium — a roughly square card. Fits text, a background image, and one or two actions.
- Large — a tall card spanning two rows. Room for richer content, multiple blocks, and full action bars.
Your template should handle all three via $when conditions. Here's how the main template renders in each size:
Add template files to the project
You'll also need a background image asset. Create a 300×200 pixel image (3:2 aspect ratio) and save it as Assets/background-small.png. Keep visual focus near the center so text stays readable.
Add content entries to your .csproj:
<ItemGroup>
  <Content Include="Templates\CatFactTemplate.json">
    <CopyToOutputDirectory>PreserveNewest</CopyToOutputDirectory>
  </Content>
  <Content Include="Templates\LoadingTemplate.json">
    <CopyToOutputDirectory>PreserveNewest</CopyToOutputDirectory>
  </Content>
  <Content Include="Assets\background-small.png">
    <CopyToOutputDirectory>PreserveNewest</CopyToOutputDirectory>
  </Content>
</ItemGroup>{"fact": "Cats sleep 70% of their lives.", "errorMessage": null, "backgroundImageDataUri": ""}), and confirm it renders. Catching template errors here saves debugging time later.
The catfact.ninja API is free, requires no auth, and returns a JSON object with a fact field.
Create Services/CatFactService.cs:
using System.Net.Http.Json;
using System.Text.Json;
using System.Text.Json.Serialization;

namespace Xakpc.Widgets.Playground.Services;

public sealed class CatFactService
{
    private static readonly HttpClient Http = new()
    {
        BaseAddress = new Uri("https://catfact.ninja/"),
        Timeout = TimeSpan.FromSeconds(10)
    };

    public async Task<string?> GetFactAsync(CancellationToken ct = default)
    {
        try
        {
            var response = await Http.GetFromJsonAsync<CatFactResponse>("fact", ct);
            var fact = response?.Fact?.Trim();
            return string.IsNullOrWhiteSpace(fact) ? null : fact;
        }
        catch (OperationCanceledException)
        {
            throw;
        }
        catch (HttpRequestException)
        {
            return null;
        }
        catch (JsonException)
        {
            return null;
        }
        catch (NotSupportedException)
        {
            return null;
        }
    }

    private sealed class CatFactResponse
    {
        [JsonPropertyName("fact")]
        public string? Fact { get; init; }
    }
}
Design decisions:
- Static
HttpClient. One instance for the app lifetime. Creating a newHttpClientper request leaks sockets. This is standard practice, not widget-specific. - Returns
nullon failure. The caller decides the fallback behavior. The service doesn't assume what the widget should show when the API is down. - Explicit timeout. 10 seconds prevents a stalled API from hanging your widget update indefinitely.
- Cancellation propagates.
OperationCanceledExceptionis rethrown so callers can cancel cleanly. All other failures returnnull.
Each pinned widget has an ID (assigned by the host), a definition name (from your manifest), and custom state you can persist. Create a model to track this.
Models/CompactWidgetInfo.cs:
namespace Xakpc.Widgets.Playground.Models;

public sealed class CompactWidgetInfo
{
    public string WidgetId { get; set; } = string.Empty;
    public string DefinitionId { get; set; } = string.Empty;
    public string CustomState { get; set; } = string.Empty;
}
CustomState is the persistence mechanism. When you update a widget, you send a CustomState string to the host. The host stores it. When your app restarts, you read it back. For our widget, it holds the last displayed cat fact — so the user sees content immediately after a reboot, before the API responds.
This is the core of the app. Create WidgetProvider.cs implementing IWidgetProvider. The host calls these methods at specific lifecycle points.
Class skeleton and fields
using Microsoft.Windows.Widgets.Providers;
using System.Runtime.InteropServices;
using Xakpc.Widgets.Playground.Models;
using Xakpc.Widgets.Playground.Services;

namespace Xakpc.Widgets.Playground;

[ComVisible(true)]
[ComDefaultInterface(typeof(IWidgetProvider))]
[Guid("4C363B3C-0E2D-4ACF-A797-40DE1B6D4FAD")]
internal sealed class WidgetProvider : IWidgetProvider
{
    private const string DefaultFact = "Loading your first cat fact...";
    private const string RefreshError = "Could not refresh right now. Showing last saved fact.";

    private readonly Lock _sync = new();
    private readonly Dictionary<string, CompactWidgetInfo> _runningWidgets = new(StringComparer.Ordinal);
    private readonly CatFactService _catFacts = new();
    private static readonly ManualResetEvent EmptyWidgetListEvent = new(false);

    private static readonly Lazy<string> MainTemplate = new(() => LoadTemplate("Templates/CatFactTemplate.json"));
    private static readonly Lazy<string> LoadingTemplate = new(() => LoadTemplate("Templates/LoadingTemplate.json"));
    private static readonly Lazy<string> BackgroundImageDataUri = new(() =>
        LoadImageAsDataUri("Assets/background-small.png", "image/png"));

    public static WaitHandle GetEmptyWidgetListEvent() => EmptyWidgetListEvent;
}The [Guid("...")] attribute is your provider's CLSID. Generate your own GUID (Visual Studio → Tools → Create GUID). This same GUID must appear in three places: here, and twice in the package manifest. GUID mismatch is the #1 cause of "my widget doesn't appear."
[ComVisible(true)] and [ComDefaultInterface(typeof(IWidgetProvider))] ensure the COM runtime can see and activate your provider class. Without them, COM activation may silently fail.
The _sync lock (using .NET's Lock type, available from .NET 9+) protects _runningWidgets because host callbacks are synchronous entry points, but refresh work runs on background tasks. Without the lock, they can race and corrupt state.
Startup recovery
When your app starts, widgets might already be pinned (after a system restart, for example). The constructor recovers them:
public WidgetProvider()
{
    RecoverRunningWidgets();
}

private void RecoverRunningWidgets()
{
    try
    {
        var infos = WidgetManager.GetDefault().GetWidgetInfos();
        if (infos is null)
            return;

        lock (_sync)
        {
            foreach (var info in infos)
            {
                var context = info.WidgetContext;
                _runningWidgets[context.Id] = new CompactWidgetInfo
                {
                    WidgetId = context.Id,
                    DefinitionId = context.DefinitionId,
                    CustomState = string.IsNullOrWhiteSpace(info.CustomState)
                        ? DefaultFact : info.CustomState
                };
            }

            if (_runningWidgets.Count == 0)
                EmptyWidgetListEvent.Set();
            else
                EmptyWidgetListEvent.Reset();
        }
    }
    catch
    {
        // WidgetManager can fail before proper widget host activation.
    }
}
The try/catch is necessary because WidgetManager can throw if the widget host hasn't fully initialized — for example, during early app startup or if the host service isn't running. The CustomState you saved earlier comes back here. The user sees their last cat fact immediately, even before the API responds.
CreateWidget — a widget was pinned
public void CreateWidget(WidgetContext widgetContext)
{
    var widget = GetOrCreateWidget(widgetContext, null);
    SendLoadingWidget(widget);
    _ = RefreshAndUpdateAsync(widget.WidgetId);
}

private CompactWidgetInfo GetOrCreateWidget(WidgetContext context, string? customState)
{
    lock (_sync)
    {
        if (_runningWidgets.TryGetValue(context.Id, out var existing))
        {
            if (!string.IsNullOrWhiteSpace(customState))
                existing.CustomState = customState;

            return Clone(existing);
        }

        var created = new CompactWidgetInfo
        {
            WidgetId = context.Id,
            DefinitionId = context.DefinitionId,
            CustomState = string.IsNullOrWhiteSpace(customState) ? DefaultFact : customState
        };

        _runningWidgets[created.WidgetId] = created;
        EmptyWidgetListEvent.Reset();
        return Clone(created);
    }
}
The key pattern: send the loading template immediately so the widget isn't blank, then start an async API call in the background. The IWidgetProvider interface methods are synchronous — you can't await inside them. Fire-and-forget (_ = RefreshAndUpdateAsync(...)) is the standard approach.
GetOrCreateWidget returns a Clone() — a snapshot of the widget state. This is deliberate: the snapshot is used outside the lock for rendering, so it must not share a reference with the dictionary entry that background tasks might mutate concurrently.
DeleteWidget — it was unpinned
public void DeleteWidget(string widgetId, string customState)
{
    lock (_sync)
    {
        _runningWidgets.Remove(widgetId);

        if (_runningWidgets.Count == 0)
            EmptyWidgetListEvent.Set();
    }
}
OnActionInvoked — the user clicked "Refresh"
public void OnActionInvoked(WidgetActionInvokedArgs actionInvokedArgs)
{
    if (!string.Equals(actionInvokedArgs.Verb, "refresh", StringComparison.Ordinal))
        return;

    if (!HasWidget(actionInvokedArgs.WidgetContext.Id))
        return;

    _ = RefreshAndUpdateAsync(actionInvokedArgs.WidgetContext.Id);
}

private bool HasWidget(string widgetId)
{
    lock (_sync)
    {
        return _runningWidgets.ContainsKey(widgetId);
    }
}
The verb matches the string from the Adaptive Card template. "refresh" → call the API, get a fresh fact, push it to the host.
OnWidgetContextChanged — the user resized it
public void OnWidgetContextChanged(WidgetContextChangedArgs contextChangedArgs)
{
    var widget = GetWidgetSnapshot(contextChangedArgs.WidgetContext.Id);
    if (widget is null)
        return;

    SendFactWidget(widget, null);
}

private CompactWidgetInfo? GetWidgetSnapshot(string widgetId)
{
    lock (_sync)
    {
        return _runningWidgets.TryGetValue(widgetId, out var widget) ? Clone(widget) : null;
    }
}
Since the template uses $when for conditional rendering, we re-send the same data. The host handles the size change. No need to fetch a new fact for a resize.
Activate / Deactivate — visibility tracking
public void Activate(WidgetContext widgetContext)
{
    var widget = GetOrCreateWidget(widgetContext, null);
    SendFactWidget(widget, null);
    _ = RefreshAndUpdateAsync(widget.WidgetId);
}

public void Deactivate(string widgetId)
{
    // Intentionally minimal for tutorial: no active polling to pause.
}
Activate means the Widget Board is showing your widget right now. We re-render current data immediately, then trigger a background refresh. This is important: small widgets have no refresh button, so activation is the only time they get new content.
Deactivate means the board was closed or the widget scrolled out of view. In a production app with background polling, you'd pause it here.
The rendering pipeline
private void SendLoadingWidget(CompactWidgetInfo widget)
{
    var update = new WidgetUpdateRequestOptions(widget.WidgetId)
    {
        Template = LoadingTemplate.Value,
        Data = "{}",
        CustomState = widget.CustomState
    };

    WidgetManager.GetDefault().UpdateWidget(update);
}

private void SendFactWidget(CompactWidgetInfo widget, string? errorMessage)
{
    var fact = string.IsNullOrWhiteSpace(widget.CustomState) ? DefaultFact : widget.CustomState;

    var update = new WidgetUpdateRequestOptions(widget.WidgetId)
    {
        Template = MainTemplate.Value,
        Data = BuildDataPayload(fact, errorMessage, BackgroundImageDataUri.Value),
        CustomState = fact
    };

    WidgetManager.GetDefault().UpdateWidget(update);
}
Template is the Adaptive Card JSON. Data is a small JSON object with the values your template references. CustomState is the string the host persists for you.
Building the data payload
private static string BuildDataPayload(string fact, string? errorMessage, string backgroundImageDataUri)
{
    if (string.IsNullOrWhiteSpace(errorMessage))
    {
        return $$"""{"fact":"{{EscapeJson(fact)}}","errorMessage":null,"backgroundImageDataUri":"{{EscapeJson(backgroundImageDataUri)}}"}""";
    }

    return $$"""{"fact":"{{EscapeJson(fact)}}","errorMessage":"{{EscapeJson(errorMessage)}}","backgroundImageDataUri":"{{EscapeJson(backgroundImageDataUri)}}"}""";
}

private static string EscapeJson(string value) =>
value.Replace("\\", "\\\\").Replace("\"", "\\\"");EscapeJson is critical. Cat facts can contain quotes and special characters. Without escaping, your JSON payload breaks and the widget goes blank. This is one of the most common bugs in widget development.
Background image loading
private static string LoadImageAsDataUri(string relativePath, string mimeType)
{
    var normalizedPath = relativePath.Replace('/', Path.DirectorySeparatorChar);
    var fullPath = Path.Combine(AppContext.BaseDirectory, normalizedPath);
    var imageBytes = File.ReadAllBytes(fullPath);
    return $"data:{mimeType};base64,{Convert.ToBase64String(imageBytes)}";
}
The provider loads the background image once, converts it to a base64 data URI, and includes it in every data payload. This avoids relying on ms-appx:/// URI resolution inside the widget host, which can be unreliable.
Template loading and cloning helpers
private static string LoadTemplate(string relativePath)
{
    var normalizedPath = relativePath.Replace('/', Path.DirectorySeparatorChar);
    var fullPath = Path.Combine(AppContext.BaseDirectory, normalizedPath);
    return File.ReadAllText(fullPath);
}

private static CompactWidgetInfo Clone(CompactWidgetInfo widget) =>
    new()
    {
        WidgetId = widget.WidgetId,
        DefinitionId = widget.DefinitionId,
        CustomState = widget.CustomState
    };
The async refresh pipeline
private async Task RefreshAndUpdateAsync(string widgetId)
{
    string? fetchedFact = null;
    string? errorMessage = null;

    try
    {
        fetchedFact = await _catFacts.GetFactAsync().ConfigureAwait(false);
        if (string.IsNullOrWhiteSpace(fetchedFact))
            errorMessage = RefreshError;
    }
    catch (OperationCanceledException)
    {
        throw;
    }
    catch
    {
        errorMessage = RefreshError;
    }

    CompactWidgetInfo? snapshot;
    lock (_sync)
    {
        if (!_runningWidgets.TryGetValue(widgetId, out var widget))
            return; // Widget was deleted during the API call

        if (!string.IsNullOrWhiteSpace(fetchedFact))
            widget.CustomState = fetchedFact;

        snapshot = Clone(widget);
    }

    SendFactWidget(snapshot, errorMessage);
}
.ConfigureAwait(false) avoids deadlocks by not capturing the synchronization context — important since the caller is fire-and-forget from a synchronous COM callback.
Race handling matters here: if the widget is unpinned while the API call runs, the method returns safely. A stale background result cannot recreate a deleted widget. The Clone() ensures we render from a snapshot taken under the lock, not a live reference.
When the API fails, CustomState keeps its previous value — stale data beats no data on a glanceable surface.
The Widget Board uses COM activation to create your provider. You need a class factory — an object that knows how to create WidgetProvider when the OS asks for it.
Create FactoryHelper.cs (the namespace uses Com but the file lives at the project root):
using Microsoft.Windows.Widgets.Providers;
using System.Runtime.InteropServices;
using WinRT;

namespace Xakpc.Widgets.Playground.Com;

internal static class ComGuids
{
    public const string IClassFactory = "00000001-0000-0000-C000-000000000046";
    public const string IUnknown = "00000000-0000-0000-C000-000000000046";
}

[ComImport]
[InterfaceType(ComInterfaceType.InterfaceIsIUnknown)]
[Guid(ComGuids.IClassFactory)]
internal interface IClassFactory
{
    [PreserveSig]
    int CreateInstance(IntPtr pUnkOuter, ref Guid riid, out IntPtr ppvObject);

    [PreserveSig]
    int LockServer(bool fLock);
}

internal sealed class WidgetProviderFactory<TProvider> : IClassFactory
    where TProvider : IWidgetProvider, new()
{
    private static readonly Guid IUnknownGuid = Guid.Parse(ComGuids.IUnknown);
    private static readonly Guid WidgetProviderInterfaceGuid = typeof(IWidgetProvider).GUID;

    private const int S_OK = 0;
    private const int CLASS_E_NOAGGREGATION = unchecked((int)0x80040110);
    private const int E_NOINTERFACE = unchecked((int)0x80004002);

    public int CreateInstance(IntPtr pUnkOuter, ref Guid riid, out IntPtr ppvObject)
    {
        ppvObject = IntPtr.Zero;

        if (pUnkOuter != IntPtr.Zero)
            return CLASS_E_NOAGGREGATION;

        var classGuid = typeof(TProvider).GUID;
        if (riid != classGuid && riid != WidgetProviderInterfaceGuid && riid != IUnknownGuid)
            return E_NOINTERFACE;

        ppvObject = MarshalInspectable<IWidgetProvider>.FromManaged(new TProvider());
        return S_OK;
    }

    public int LockServer(bool fLock) => S_OK;
}
This is pure plumbing. When the host asks for a CLSID, the factory creates a WidgetProvider instance and hands it over through COM interop. Copy it, move on.
Program.cs registers your COM factory with Windows so the host can find your provider.
using System.Runtime.InteropServices;
using Xakpc.Widgets.Playground.Com;

namespace Xakpc.Widgets.Playground;

internal static class Program
{
    private const uint CLSCTX_LOCAL_SERVER = 0x4;
    private const uint REGCLS_MULTIPLEUSE = 0x1;

    [DllImport("kernel32.dll")]
    private static extern IntPtr GetConsoleWindow();

    [DllImport("ole32.dll")]
    private static extern int CoRegisterClassObject(
        [MarshalAs(UnmanagedType.LPStruct)] Guid rclsid,
        [MarshalAs(UnmanagedType.Interface)] IClassFactory pUnk,
        uint dwClsContext,
        uint flags,
        out uint lpdwRegister);

    [DllImport("ole32.dll")]
    private static extern int CoRevokeClassObject(uint dwRegister);

    [MTAThread]
    private static void Main(string[] args)
    {
        if (args.Length == 0 ||
            !string.Equals(args[0], "-RegisterProcessAsComServer", StringComparison.Ordinal))
        {
            Console.WriteLine("Not launched for widget provider activation. Exiting.");
            return;
        }

        WinRT.ComWrappersSupport.InitializeComWrappers();

        uint cookie = 0;
        var factory = new WidgetProviderFactory<WidgetProvider>();
        var registerResult = CoRegisterClassObject(
            typeof(WidgetProvider).GUID,
            factory,
            CLSCTX_LOCAL_SERVER,
            REGCLS_MULTIPLEUSE,
            out cookie);

        if (registerResult < 0)
            Marshal.ThrowExceptionForHR(registerResult);

        try
        {
            if (GetConsoleWindow() != IntPtr.Zero)
            {
                Console.WriteLine("Widget provider registered. Press ENTER to exit.");
                Console.ReadLine();
            }
            else
            {
                WidgetProvider.GetEmptyWidgetListEvent().WaitOne();
            }
        }
        finally
        {
            if (cookie != 0)
                CoRevokeClassObject(cookie);
        }
    }
}
The flow:
- The host launches your app with
-RegisterProcessAsComServeras a command-line argument - Your app initializes WinRT COM wrappers
CoRegisterClassObjecttells Windows: "if anyone asks for this CLSID, here's the factory"- The app waits — in console mode (development), it waits for Enter; in production (no console window), it waits until all widgets are unpinned
- On exit, it revokes the COM registration
Notice typeof(WidgetProvider).GUID — this reads the GUID from the [Guid(...)] attribute on your provider class. No copy-paste drift between files.
WinRT.ComWrappersSupport.InitializeComWrappers() must be called before COM registration. Without it, managed-to-native interop fails silently.
The package manifest must declare a COM server extension and a widget app extension. If anything is misaligned, the widget silently fails to appear.
Enable MSIX packaging in the project
Add these properties to your .csproj <PropertyGroup>:
<RuntimeIdentifier>win-x64</RuntimeIdentifier>
<EnableMsixTooling>true</EnableMsixTooling>
<GenerateAppInstallerFile>false</GenerateAppInstallerFile>
<AppxPackageSigningEnabled>false</AppxPackageSigningEnabled>
And add this item group for Visual Studio MSIX support:
<ItemGroup Condition="'$(DisableMsixProjectCapabilityAddedByProject)' != 'true' and '$(EnableMsixTooling)' == 'true'">
  <ProjectCapability Include="Msix" />
</ItemGroup>
Create Package.appxmanifest
This file lives in your project root. It needs namespace declarations for COM and widget extensions:
<?xml version="1.0" encoding="utf-8"?>
<Package
  xmlns="http://schemas.microsoft.com/appx/manifest/foundation/windows10"
  xmlns:uap="http://schemas.microsoft.com/appx/manifest/uap/windows10"
  xmlns:uap3="http://schemas.microsoft.com/appx/manifest/uap/windows10/3"
  xmlns:rescap="http://schemas.microsoft.com/appx/manifest/foundation/windows10/restrictedcapabilities"
  xmlns:com="http://schemas.microsoft.com/appx/manifest/com/windows10"
  IgnorableNamespaces="uap uap3 rescap">

  <!-- Set your own Identity values -->
  <Identity Name="YourName.Widgets.Playground"
            Version="1.0.0.0"
            Publisher="CN=YourName" />

  <!-- ... standard Properties, Dependencies, Resources ... -->

  <Applications>
    <Application Id="App"
      Executable="$targetnametoken$.exe"
      EntryPoint="$targetentrypoint$">

      <uap:VisualElements
        AppListEntry="none"
        DisplayName="Widgets Playground"
        Square150x150Logo="Assets\Square150x150Logo.png"
        Square44x44Logo="Assets\Square44x44Logo.png"
        Description="Cat Fact Widget"
        BackgroundColor="transparent" />

      <Extensions>

        <!-- 1. COM registration -->
        <com:Extension Category="windows.comServer">
          <com:ComServer>
            <com:ExeServer
              Executable="Xakpc.Widgets.Playground.exe"
              Arguments="-RegisterProcessAsComServer"
              DisplayName="Widgets Playground Provider">
              <com:Class Id="4C363B3C-0E2D-4ACF-A797-40DE1B6D4FAD"
                         DisplayName="WidgetProvider" />
            </com:ExeServer>
          </com:ComServer>
        </com:Extension>

        <!-- 2. Widget declaration -->
        <uap3:Extension Category="windows.appExtension">
          <uap3:AppExtension
            Name="com.microsoft.windows.widgets"
            DisplayName="Widgets Playground"
            Id="xakpc.widgets.playground">
            <uap3:Properties>
              <WidgetProvider>
                <ProviderIcons>
                  <Icon Path="Assets\icon.png" />
                </ProviderIcons>
                <Activation>
                  <CreateInstance ClassId="4C363B3C-0E2D-4ACF-A797-40DE1B6D4FAD" />
                </Activation>
                <Definitions>
                  <Definition
                    Id="CatFact_Widget"
                    DisplayName="Random Cat Fact"
                    Description="Random cat facts"
                    IsCustomizable="false">
                    <Capabilities>
                      <Capability><Size Name="small" /></Capability>
                      <Capability><Size Name="medium" /></Capability>
                      <Capability><Size Name="large" /></Capability>
                    </Capabilities>
                    <ThemeResources>
                      <Icons>
                        <Icon Path="Assets\icon.png" />
                      </Icons>
                      <Screenshots>
                        <Screenshot Path="Assets\screenshots\CatFactScreenshot.png"
                                    DisplayAltText="Cat Fact Widget" />
                      </Screenshots>
                      <DarkMode>
                        <Icons><Icon Path="Assets\icon.png" /></Icons>
                        <Screenshots>
                          <Screenshot Path="Assets\screenshots\CatFactScreenshot.png"
                                      DisplayAltText="Cat Fact Widget" />
                        </Screenshots>
                      </DarkMode>
                      <LightMode>
                        <Icons><Icon Path="Assets\icon.png" /></Icons>
                        <Screenshots>
                          <Screenshot Path="Assets\screenshots\CatFactScreenshot.png"
                                      DisplayAltText="Cat Fact Widget" />
                        </Screenshots>
                      </LightMode>
                    </ThemeResources>
                  </Definition>
                </Definitions>
              </WidgetProvider>
            </uap3:Properties>
          </uap3:AppExtension>
        </uap3:Extension>

      </Extensions>
    </Application>
  </Applications>

  <Capabilities>
    <rescap:Capability Name="runFullTrust" />
  </Capabilities>
</Package>
The GUID alignment rule
The same GUID must appear in exactly three places. If any one is different, the widget fails silently.
Program.cs uses typeof(WidgetProvider).GUID, so it stays aligned automatically.
Required asset files
Every path referenced in the manifest must point to an actual file. Missing or misspelled paths cause the widget to silently not appear in the picker.
| Category | File |
|---|---|
| Package-level | Assets\StoreLogo.png |
| Package-level | Assets\Square150x150Logo.png |
| Package-level | Assets\Square44x44Logo.png |
| Widget metadata | Assets\icon.png |
| Widget metadata | Assets\screenshots\CatFactScreenshot.png |
Add a launch profile for debugging
Create Properties/launchSettings.json:
{
  "profiles": {
    "Provider": {
      "commandName": "MsixPackage",
      "commandLineArgs": "-RegisterProcessAsComServer"
    },
    "Provider on launch": {
      "commandName": "MsixPackage",
      "commandLineArgs": "-RegisterProcessAsComServer",
      "doNotLaunchApp": true
    }
  }
}
The MsixPackage command tells Visual Studio to deploy the package as part of the run/debug flow. "Provider on launch" with doNotLaunchApp: true is the recommended profile — it deploys the package but lets the host activate your app through COM, which is the real activation path.
Things that silently break discovery
- COM argument mismatch. The manifest must specify
-RegisterProcessAsComServer.Program.csmust check for that exact string. If they differ, the host launches your app but COM registration never happens. - Executable name mismatch.
<com:ExeServer Executable="...">must match your actual.exefilename. - Stale deployment. After manifest changes, you must rebuild and redeploy. Windows caches package metadata.
- Identity drift. Changing
Identity NameorPublishercreates a new package identity. Check withGet-AppxPackageand remove stale packages. - Editing generated manifests. Only edit
Package.appxmanifestin your project source. Do not edit files underbuild/bin/.
Switch OutputType for deployment
Up to now, the project uses <OutputType>Exe</OutputType> — a console app. That's useful during development: you see log output in the console window, and Program.cs waits for Enter to exit.
For deployment and distribution, switch to WinExe:
<OutputType>WinExe</OutputType>
This removes the console window from the final packaged app. The COM activation flow stays unchanged — -RegisterProcessAsComServer still works — but there's no visible window for the user. The GetConsoleWindow() check in Program.cs handles both modes: with a console it waits for Enter (debugging), without one it waits for the empty-widget-list event (production).
Exe for debugging. Switch to WinExe before packaging for the Store. With WinExe, you lose console log output — use System.Diagnostics.Debug.WriteLine and the Visual Studio Output window instead.Preflight checklist
Before running, verify every item. A single mismatch causes silent failure.
| Check | Where |
|---|---|
launchSettings.json includes MsixPackage profiles |
Properties/launchSettings.json |
Manifest has windows.comServer extension |
Package.appxmanifest |
Manifest has windows.appExtension with Name="com.microsoft.windows.widgets" |
Package.appxmanifest |
| GUID matches in all 3 locations | WidgetProvider.cs ↔ manifest |
Solution platform set to x64 or ARM64 |
Visual Studio toolbar |
OutputType is Exe (debug) or WinExe (deploy) |
.csproj |
Deploy and test
- Open the solution in Visual Studio
- Set the solution platform to
x64(orARM64on ARM devices) - Select the "Provider on launch" profile
- Start debugging (F5) or start without debugging (Ctrl+F5)
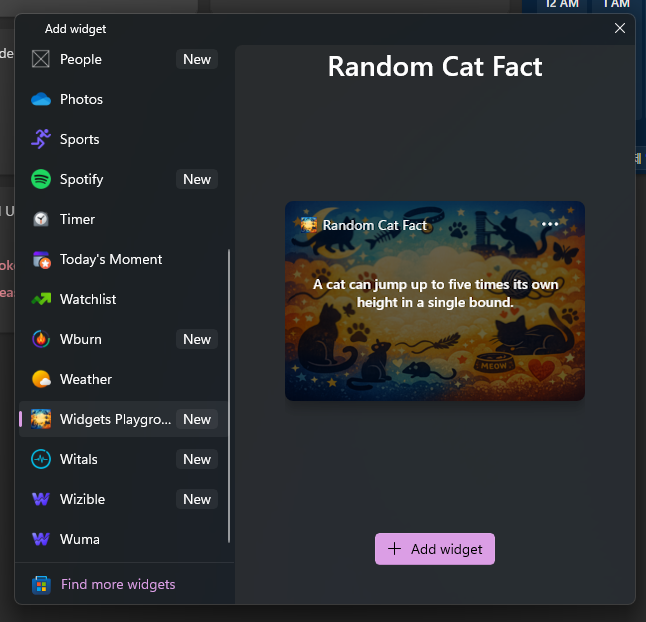
- Open Widget Board (Win+W)
- Click Add widgets
- Find "Random Cat Fact" and pin it
The widget should show a loading state, then display a cat fact with your background image.
What to verify
| Scenario | Expected behavior |
|---|---|
| Small size | Fact displayed, no refresh button |
| Medium/Large size | Fact displayed, refresh button visible |
| Click Refresh | New fact appears (or error message with last fact preserved) |
| Close and reopen Widget Board | Fact refreshes on activation (all sizes) |
| Restart the provider process | Last known fact restored from CustomState before API responds |
| Background image | Visible behind text on all sizes |
Check in this order:
- Does it build? (
dotnet build) - Is the launch profile set to
MsixPackagewith the COM argument? - Does the GUID match in all three places?
- Are both manifest extension blocks present and valid?
- Do all manifest asset paths point to real files?
- Is the deployed package up to date?
Symptom → likely cause → fix
| Symptom | Likely cause | Fix |
|---|---|---|
| Widget not in picker | Missing/invalid windows.appExtension block, or stale deployment |
Check manifest, redeploy |
| In picker but pinning fails | CLSID mismatch or wrong COM executable name | Verify GUID in all 3 locations, check Executable attribute |
| Widget pins but never updates | -RegisterProcessAsComServer arg mismatch |
Compare manifest Arguments with Program.cs arg check |
| Widget is blank | Malformed template JSON or data payload | Test template in Adaptive Cards Designer, check JSON escaping |
| Background missing | backgroundImageDataUri not in payload, or image not in package |
Check BuildDataPayload, verify asset in project content |
| Old behavior after manifest edits | Stale installed package | Rebuild, redeploy, remove old package identities |
No MsixPackage profile in VS |
MSIX tooling not recognized | Add EnableMsixTooling + ProjectCapability to .csproj |
Identity/cache reset
When changes don't show up after redeploy:
Get-AppxPackage | Where-Object { $_.Name -like "*YourWidget*" } | Select-Object Name, PackageFullName, PublisherIf multiple old identities exist, remove stale packages and redeploy the current one.
The tutorial widget works. Before connecting it to a real API, consider these hardening steps.
Add logging. Wire a minimal logger to lifecycle callbacks and refresh events. Keep logs short and high-signal.
internal static class Log
{
    public static void Info(string message)
    {
        var line = $"[{DateTimeOffset.Now:O}] INFO {message}";
        System.Diagnostics.Debug.WriteLine(line);
        Console.WriteLine(line);
    }

    public static void Error(string message, Exception ex)
    {
        var line = $"[{DateTimeOffset.Now:O}] ERROR {message}: {ex.GetType().Name} {ex.Message}";
        System.Diagnostics.Debug.WriteLine(line);
        Console.WriteLine(line);
    }
}
Add a retry. One delayed retry improves success rate on flaky networks without adding complexity. Keep it bounded — widgets should stay responsive.
Throttle activation refreshes. The Widget Board can activate widgets frequently during rapid open/close interactions. Track last refresh time per widget and skip refreshes within a short window (10 seconds works well).
Bound payload size. Some APIs return unexpectedly long text. Truncate to a safe display length before writing to CustomState.
private static string NormalizeFact(string fact)
{
    const int max = 400;
    var trimmed = fact.Trim();
    return trimmed.Length <= max ? trimmed : $"{trimmed[..max]}...";
}
Never let exceptions escape lifecycle callbacks. The host calls your provider through COM. Unhandled exceptions in callbacks can crash the host or leave the widget in a broken state. Catch, log, and continue with fallback content.
What's Next
You have a working widget connected to a live API. The pattern scales to any data source:
- Connect to your own API. Replace catfact.ninja with your service's endpoint. The
Activate/Deactivatelifecycle tells you when to poll. - Handle auth. Most real APIs need tokens. Windows provides secure storage patterns for credentials in packaged apps.
- Design for the surface. The widget is small. Conditional rendering and multiple sizes let you show the right density of information for each size. Spend time in the Adaptive Cards Designer getting the layout right.
- Publish to the Microsoft Store. Package the MSIX, submit it, and your widget becomes discoverable to 250M+ Windows 11 users.
The architecture is straightforward once you get past the COM and manifest boilerplate. The real challenge is designing content that earns its place on someone's desktop — something worth seeing at a glance, dozens of times a day.
The full source code for this tutorial is on GitHub — xakpc/Widgets.Playground. Clone it, compare against your own implementation, or use it as a starting point.